9. Appendices
This appendix describes:
- How to create a VM for Dashboard server and API component interface tests, Dashboard UI-based tests
- How to create a Tupelo server VM for Tupelo tests
- How to install Tupelo client
- How to plan tests with JIRA
- How to use the test report generation scripts in the
$GIT/dims-trrepo. - How to use
batsfor producing and executing tests
9.1. Test Dashboard server VM
Tests performed using the Dashboard user interface, as well as some of the automated tests, require a Vagrant test server VM running on the tester’s workstation.
Whenever a test has a prerequisite of dashboard test server, it is
referring to this VM, up and running on the tester’s workstation.
9.1.1. Creating the VM
To create this VM, do the following:
The Vagrant box
ubuntu-14.04.2-amd64-base-keyedshould be installed in Vagrant. This box is created by the procedure described at dimspacker:vmquickstart. If you have already performed those steps, through the subsection dimspacker:vmquickstartinstallboxes, then you’ve already installed this box file. You can also check by:vagrant box list
If
ubuntu-14.04.2-amd64-base-keyedappears in the list, then you already have this box file installed, and you can go to the next step. If it is not installed, perform the steps at dimspacker:vmquickstart through the box installation step at dimspacker:vmquickstartinstallboxes.
Set up Vagrant directory for the VM you’re creating. You will need to name the VM - the name
dimstestserver is used in the code below
and will be used in Test prerequisite steps.
Then you will add a private IP
address to the auto-generated Vagrantfile. We are specifying the IP to be used
for testing as ``192.168.56.103.
Finally, bring the VM up usingvagrant up.cd $GIT/dims-vagrant/ubuntu-14.04.2-amd64/ make server NAME=dimstestserver cd dimstestserver ../nic2 192.168.56.103 vagrant up
Run the Ansible playbook
dims-test-server-provision.ymlas shown below. This will take a while to run since it will install the virtual environment. Once this is done, you can reuse the VM for multiple tests without destroying it../run_playbook -g dashboard-test-servers dims-test-server-provision.yml -vv
9.1.2. Resetting VM Data
A test prerequisite may specify that you reset the test VM’s data. To do this, you run
the dashboard-test-data-reset playbook as follows. CD to the VM’s Vagrantfile
directory as shown in the first step if you aren’t there already.
cd $GIT/dims-vagrant/ubuntu-14.04.2-amd64/dimstestserver
./run_playbook -g dashboard-test-servers dashboard-test-data-reset.yml -vv
9.2. Creating Tupelo server VM
Tupelo tests require a Tupelo server VM.
This server is created in a similar fashion to the dashboard test server:
- Make sure you have the box file installed as shown above in step one of creating a dashboard test server.
Set up Vagrant directory for the VM, name it
tupeloserverand give it an IP of192.168.56.102.cd $GIT/dims-vagrant/ubuntu-14.04.2-amd64/ make server NAME=tupeloserver cd tupeloserver ../nic2 192.168.56.102 vagrant up
Run the Ansible playbook
tupelo-test-server-provision.ymlas shown below../run_playbook -g tupelo-servers tupelo-server-install.yml -vv
9.3. Installing Tupelo client
The tester needs the Tupelo client installed on their host machine to perform many of the Tupelo tests. The tester installs the tupelo client on his/her developer workstation via Ansible:
RUNHOST=localhost RUNGROUP=tupelo-clients ansible-playbook -i $GIT/ansible-playbooks/dyn_inv.py $GIT/ansible-playbooks/tupelo-shell-deploy.yml -e artifact_branch=develop --ask-sudo-pass -vv
9.4. Planning tests with JIRA
This section describes how to plan a test cycle and write tests using JIRA.
9.4.1. Test cycle
We use a test cycle to plan and execute our tests. To view test cycles,
click Tests > Plan Test Cycle:
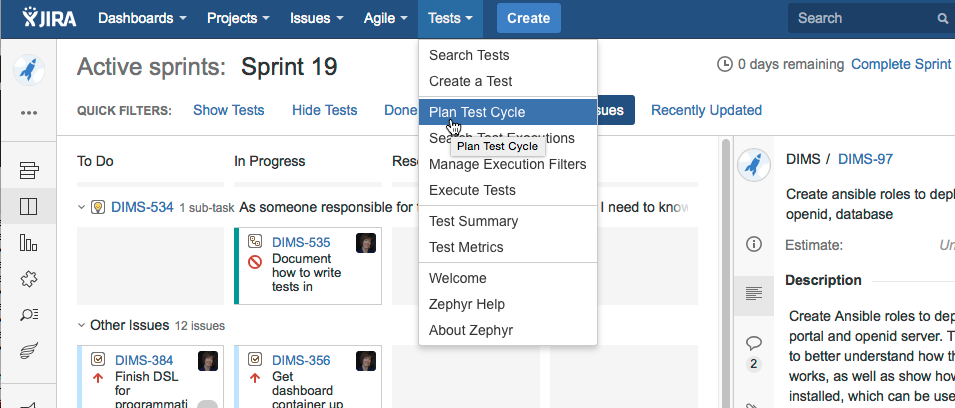
The list of cycles displays. We need a new cycle for the tests due on
11/15, so we’ll create one. Click the Create New Cycle button to bring up
a dialog to create the cycle. Give it a name and description.
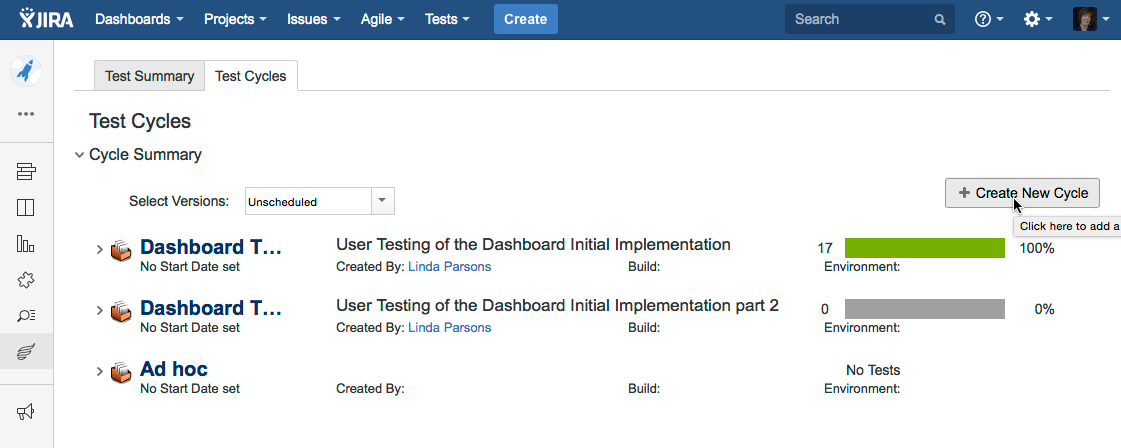
The new test cycle displays in the list. You can see that it doesn’t have any tests yet.
When you create a test in JIRA, you will add it to this test cycle.
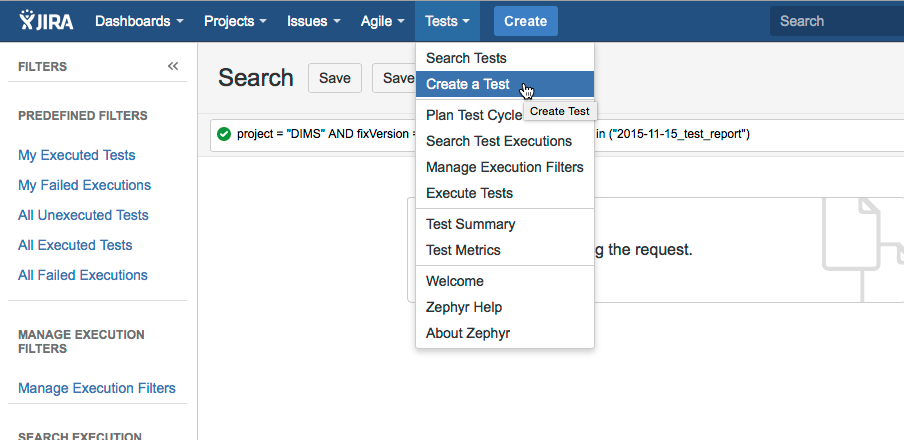
9.4.2. Creating tests
To create a new test, select Tests > Create a Test.
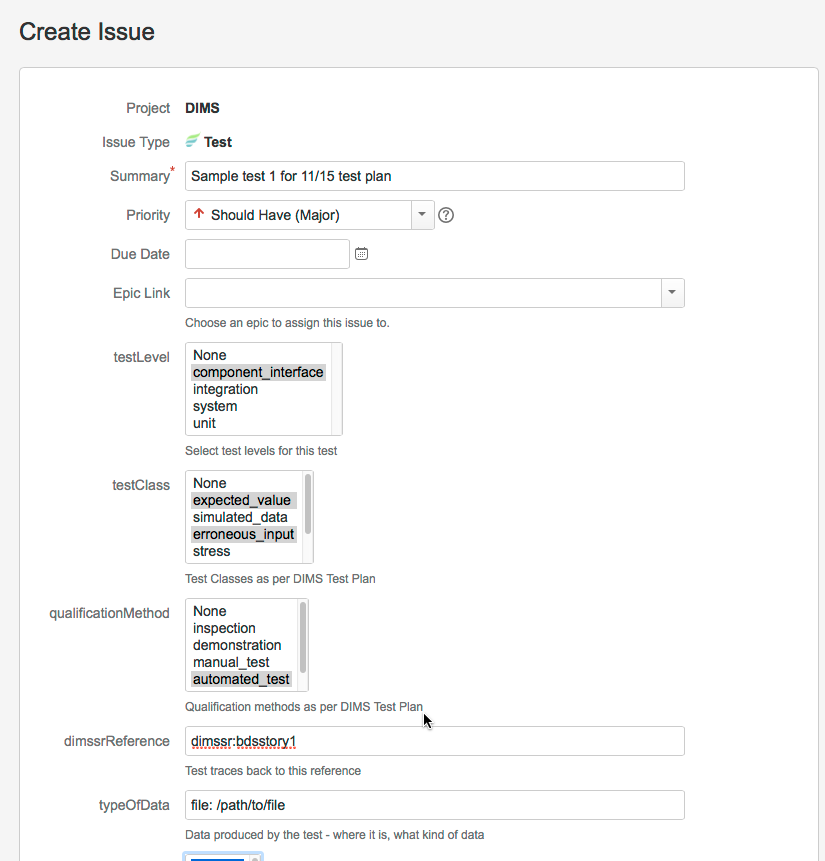
The Create Issue screen displays, with the issue type already set to Test. Enter a summary for the test, and fill in choices in the testLevel, testClass, and qualificationMethod pick boxes. These are described in this Test Plan. Choose one item per pick box. You should also add the reference to the DIMS SR - these are referenced in Section 4 of this plan for each group of planned tests. typeOfData describes where the output data will be when you are done. You can add this later if you don’t know it at this time.
The following figure shows the first part of the Create Issue dialog being filled in:
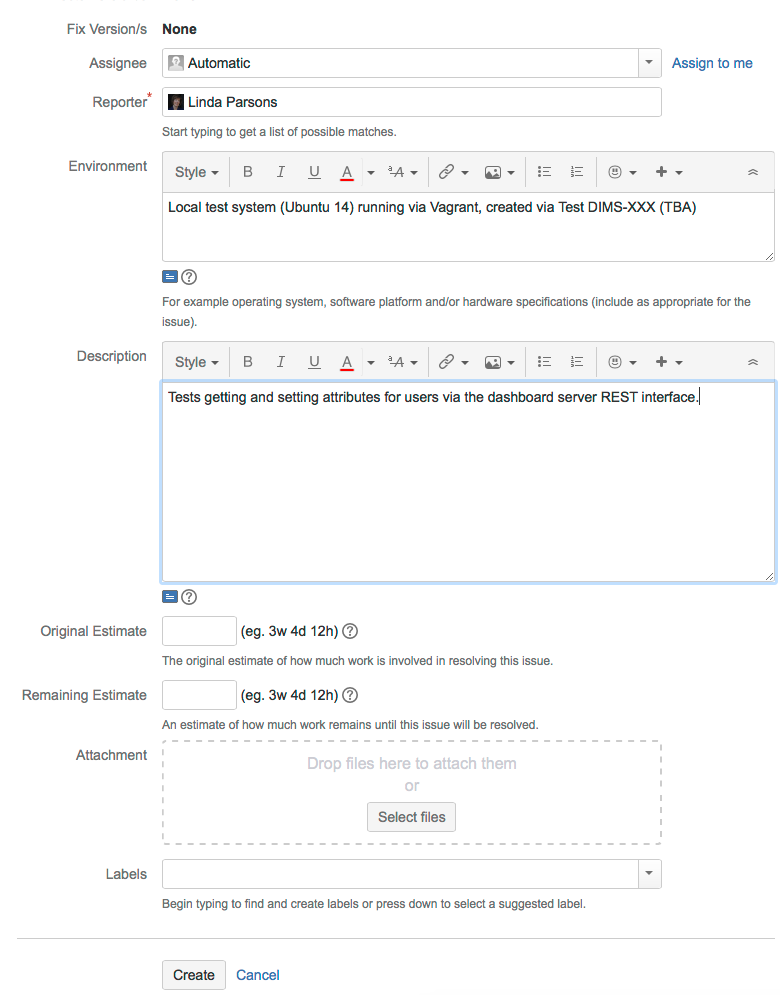
Scrolling down, you describe the Environment and provide a Description of the test. The environment entry should be short. If the test needs a local Vagrant VM to run, then the Test should reference how that is created in the prerequisites.
We enter prerequisites in the first test step. When you initially create the test, you can just add a short description and add prerequisites by editing the test.
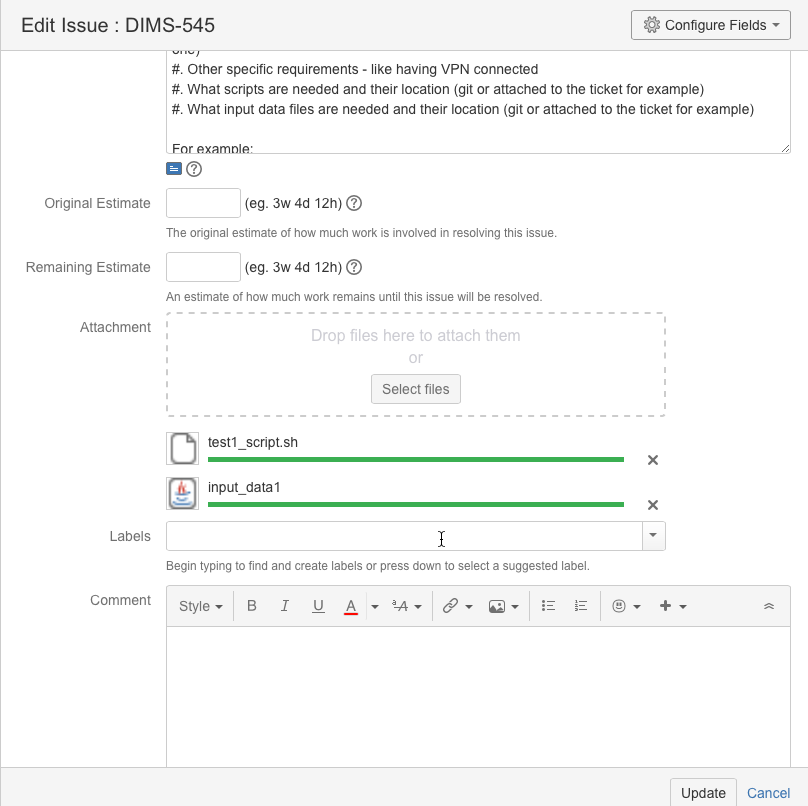
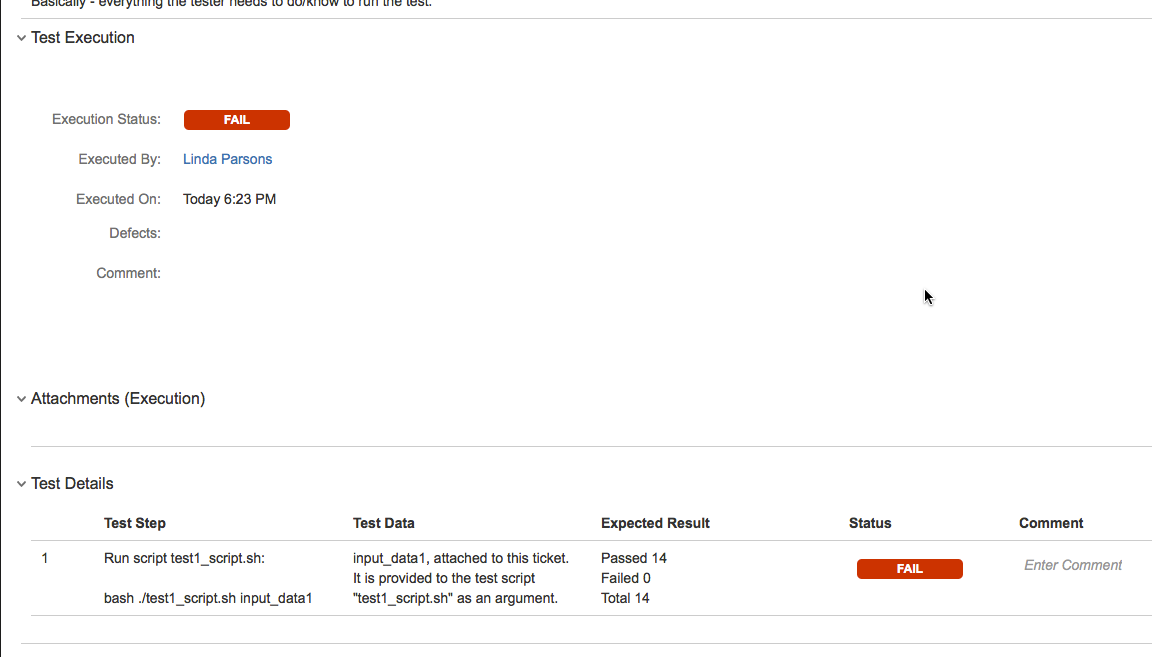
Save the test. You can further fill out fields by editing the test. For example, you can upload files needed to run the test. In this example, we are uploading a file with test data and a script which will run a number of automated tests using the test data file as input:
If files aren’t attached, the prerequisites should state where to get them.
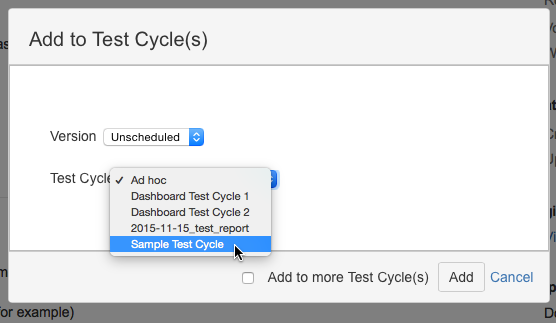
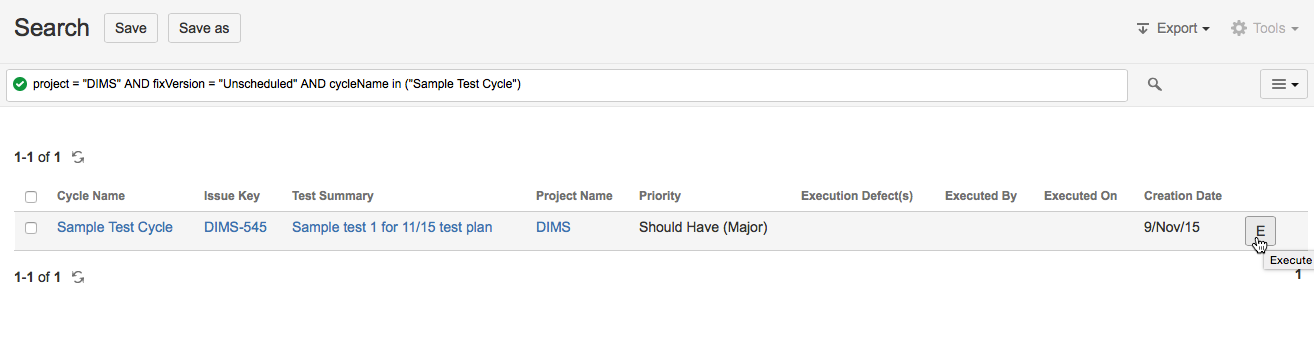
Add the test to the desired test cycle. Select More Actions > Add to Test Cycle(s):

Select the test cycle. In this example, we choose the Sample Test Cycle. You would choose the 2015-100-15_test_report test cycle for actual tests.
The test will now show up in the list of tests for that test cycle. The E button on the right is the button to click when you are going to execute the test.
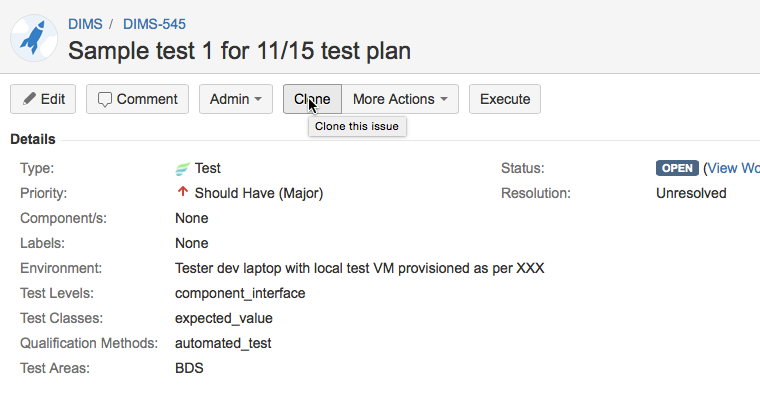
To create more tests, you can do so from scratch, or you can clone an existing test. Go to the existing test, and click Clone.
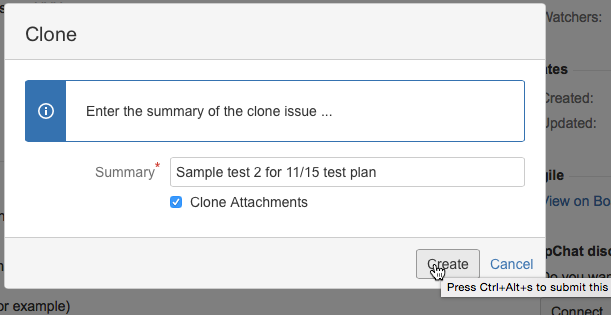
Enter a new summary for the new test. You can clone attachments if the same ones are used for the new test.
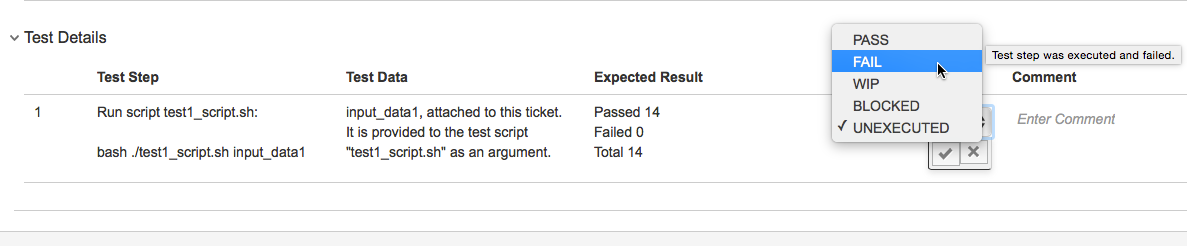
Here is an updated Sample test 2. Prerequisite info has been added to the description. The comment regarding “if test fails” isn’t needed - that was put in before we had the typeOfOutput field (will update this screenshot later);
Since this test is automated, we just have one step - to run the test script. The Expected Result is given as how many tests should pass.


9.5. Generating a Test Report with the report generation utility
Note
A Test Report is produced using a reporting utility that generates
a Sphinx document, based on source from the $GIT/dims-tr
Git repository directory. It processes metadata descriptions of
tests and their results, producing a Sphinx document.
Test cycles are named with a date, e.g., 2015-11-15.
A simple directory structure is used that combines test results
from both test managed within Jira using Zephyr for Jira, as
well as non-Jira test results. Both of these sources are rooted
at $GIT/dims-tr/test_cycles along with a copy of the
Sphinx document skeleton found in the $GIT/dims-tr/docs directory.
This separates the report and data from which the report was
generated for each test cycle into its own directory tree. For
example,
[dimscli] dittrich@27b:~/dims/git/dims-tr/test_cycles
(feature/dims-529*) $ tree
.
├── 2015-11-15
│   ├── docs
│   │   ├── Makefile
│   │   ├── build
│   │   └── source
│   ├── jira_data
│   │   ├── DIMS-553.json
│   │   ├── DIMS-553.pdf
│   │   ├── DIMS-554.json
│   │   ├── DIMS-554.pdf
│   │   ├── DIMS-565.json
│   │   ├── DIMS-565.pdf
│   │   ├── DIMS-566.json
│   │   ├── DIMS-569.json
│   │   ├── DIMS-570.json
│   │   ├── DIMS-570.pdf
│   │   ├── DIMS-571.json
│   │   ├── DIMS-571.pdf
│   │   ├── DIMS-574.json
│   │   └── DIMS-574.pdf
│   ├── jira_data_summary.json
│   └── nonjira_data
│       ├── test1.json
│       ├── test1.pdf
│       ├── test2.json
│       └── test3.json
└── 2016_00_00
    ├── docs
    │   ├── Makefile
    │   ├── build
    │   └── source
    ├── jira_data
    │   └── blahblah
    ├── jira_data_summary.json
    └── nonjira_data
        └── blahblah

20 directories, 91 files
Note
The directory 2016_00_00 is just an example to show two
sub-trees, not just one: it does not exist in Git.
A file $GIT/dims-tr/CURRENT_CYCLE contains the test cycle identifier for
the current test cycle (and can be over-ridden with a command line option in
the test utility.)
It can be used with inline command substitution in the BASH shell like this:
[dimscli] dittrich@27b:~/dims/git/dims-tr (feature/dims-529*) $ tree -L
1 test_cycles/$(cat CURRENT_CYCLE)
test_cycles/2015-11-15
├── docs
├── jira_data
├── jira_data_summary.json
└── nonjira_data

3 directories, 1 file


[dimscli] dittrich@27b:~/dims/git/dims-tr (feature/dims-529*) $ tree -L
1 test_cycles/$(cat CURRENT_CYCLE)/jira_data
test_cycles/2015-11-15/jira_data
├── DIMS-553.json
├── DIMS-553.pdf
├── DIMS-554.json
├── DIMS-554.pdf
├── DIMS-565.json
├── DIMS-565.pdf
├── DIMS-566.json
├── DIMS-569.json
├── DIMS-570.json
├── DIMS-570.pdf
├── DIMS-571.json
├── DIMS-571.pdf
├── DIMS-574.json
└── DIMS-574.pdf

0 directories, 14 files
There is a helper Makefile at the root of the repo to make it
easier to generate a report.
dimscli] dittrich@27b:~/dims/git/dims-tr (feature/dims-529*) $ make help
/Users/dittrich/dims/git/dims-tr
[Using Makefile.dims.global v1.6.124 rev ]
---------------------------------------------------------------------------
Usage: make [something]

Where "something" is one of the targets listed in the sections below.

 ---------------------------------------------------------------------------
                 Targets from Makefile.dims.global

 help - Show this help information (usually the default rule)
 dimsdefaults - show default variables included from Makefile.dims.global
 version - show the Git revision for this repo
 envcheck - perform checks of requirements for DIMS development
 ---------------------------------------------------------------------------
                   Targets from Makefile

 all - defaults to 'report'
 showcurrent - show the current test cycle
 enter - enter a test description
 report - generate a 'results.rst' file in ../docs/source/
 autobuild - run dims.sphinxautobuild for this test cycle
 install - install Python script and pre-requisites
 clean - remove build files and generated .rst files.
 spotless - clean, then also get rid of dist/ directory
---------------------------------------------------------------------------

[dimscli] dittrich@27b:~/dims/git/dims-tr (feature/dims-529*) $ make
showcurrent
Current test cycle is 2015-11-15


[dimscli] dittrich@27b:~/dims/git/dims-tr (feature/dims-529*) $ make report
python scripts/get_test.py

[dimsenv] dittrich@27b:~/dims/git/dims-tr (feature/dims-529*) $ make
autobuild
tar -cf - docs | (cd "test_cycles/2015-11-15" && tar -xf -)
rm -rf build/*
[I 151119 21:35:18 server:271] Serving on http://127.0.0.1:48196
[I 151119 21:35:18 handlers:58] Start watching changes
[I 151119 21:35:18 handlers:60] Start detecting changes

+--------- source/test3.rst changed
---------------------------------------------
/Users/dittrich/dims/git/dims-tr/test_cycles/2015-11-15/docs/source/test3.rst::
WARNING: document isn't included in any toctree
+--------------------------------------------------------------------------------


+--------- source/index.rst changed
---------------------------------------------
+--------------------------------------------------------------------------------


+--------- source/results.rst changed
-------------------------------------------
+--------------------------------------------------------------------------------

[I 151119 21:35:24 handlers:131] Browser Connected: http://127.0.0.1:48196/
9.6. Using bats for Producing and Executing Tests
The DIMS project has adopted use of the Bats: Bash Automated Testing System
(known as bats) to perform simple tests in a manner that produces
parsable output following the Test Anything Protocol (TAP).
Bats is a TAP Producer, whose output can be processed by one of many TAP Consumers, including the Python program tap.py.
9.6.1. Organizing Bats Tests
This section covers the basic functionality of bats and
how it can be used to produce test results.
We should start by looking at the --help output for bats to understand
how it works in general.
$ bats -h
Bats 0.4.0
Usage: bats [-c] [-p | -t] <test> [<test> ...]

  <test> is the path to a Bats test file, or the path to a directory
  containing Bats test files.

  -c, --count    Count the number of test cases without running any tests
  -h, --help     Display this help message
  -p, --pretty   Show results in pretty format (default for terminals)
  -t, --tap      Show results in TAP format
  -v, --version  Display the version number

  For more information, see https://github.com/sstephenson/bats
As is seen, multiple tests – files that end in .bats – can be passed
as a series of arguments on the command line. This can be either individual
arguments, or a wildcard shell expression like *.bats.
If the argument evaluates to being a directory, bats will look through that
directory and run all files in it that end in .bats.
Caution
As we will see, bats has some limitations that do not allow mixing file
arguments and directory arguments. You can either give bats one or more
files, or you can give it one or more directories, but you cannot mix
files and directories.
To see how this works, let us start with a simple example that has tests that
do nothing other than report success with their name. In this case, test
a.bats looks like this:
#!/usr/bin/env bats

@test "a" {
    [[ true ]]
}
We produce three such tests, each in their own directory, following this organizational structure:
$ tree tests
tests
├── a
│   └── a.bats
└── b
    ├── b.bats
    └── c
        └── c.bats

3 directories, 3 files
Since the hierarchy shown here does not contain tests itself, but rather holds directories that in turn hold tests, how does we run the tests?
Running bats with an argument that includes the highest level of the
directory hierarchy does not work to run any of the tests in subordinate
directories:
$ bats tests

0 tests, 0 failures
Running bats and passing a directory that contains files with
names that end in .bats runs all of the tests in that
directory.
$ bats tests/a
 ✓ a

1 test, 0 failures
If we specify the next directory tests/b, then bats
will run the tests in that directory that end in .bats,
but will not traverse down into the tests/b/c/ directory.
$ bats tests/b
 ✓ b

1 test, 0 failures
To run the tests in the lowest directory, that specific directory must be given on the command line:
$ bats tests/b/c
 ✓ c

1 test, 0 failures
Attempting to pass all of the directories along as arguments does not work, as seen here:
$ bats tests/a /tests/b tests/b/c
bats: /tmp/b does not exist
/usr/local/Cellar/bats/0.4.0/libexec/bats-exec-suite: line 20: let: count+=: syntax error: operand expected (error token is "+=")
This means that we can separate tests into subdirectories, to any depth or directory organizational structure, as needed, but tests must be run on a per-directory basis, or identified and run as a group of tests passed as file arguments using wildcards:
$ bats tests/a/*.bats tests/b/*.bats tests/b/c/*.bats
 ✓ a
 ✓ b
 ✓ c

3 tests, 0 failures
Because specifying wildcards in this way, with arbitrary
depths in the hierarchy of directories below tests/
is too hard to predict, use a program like find
to identify tests by name (possibly using wildcards or
grep filters for names), passing the results on to
a program like xargs to invoke bats on each
identified test:
$ find tests -name '*.bats' | xargs bats
1..3
ok 1 a
ok 2 b
ok 3 c
Note
Note that the output changed from the examples above, which include the
arrow (“✓”) character, to now include the word ok instead in TAP
format. This is because the default for terminals (i.e., a program that is
using a TTY device, not a simple file handle to something like a pipe). To
get the pretty-print output, add the -p flag, like this:
$ find tests -name '*.bats' | xargs bats -p
 ✓ a
 ✓ b
 ✓ c

3 tests, 0 failures
A more realistic test is seen here. This file, pycharm.bats, is the product
of a Jinja template that is installed by Ansible along with the PyCharm Community
Edition Python IDE.
#!/usr/bin/env bats
#
# Ansible managed: /home/dittrich/dims/git/ansible-playbooks/v2/roles/pycharm/templates/../templates/tests/./system/pycharm.bats.j2 modified on 2016-09-15 20:14:38 by dittrich on dimsdemo1 [ansible-playbooks v1.3.33]
#
# vim: set ts=4 sw=4 tw=0 et :

load helpers

@test "[S][EV] Pycharm is not an installed apt package." {
    ! is_installed_package pycharm
}

@test "[S][EV] Pycharm Community edition is installed in /opt" {
    results=$(ls -d /opt/pycharm-community-* | wc -l)
    echo $results >&2
    [ $results -ne 0 ]
}

@test "[S][EV] \"pycharm\" is /opt/dims/bin/pycharm" {
    assert "pycharm is /opt/dims/bin/pycharm" type pycharm
}

@test "[S][EV] /opt/dims/bin/pycharm is a symbolic link to installed pycharm" {
    [ -L /opt/dims/bin/pycharm ]
}

@test "[S][EV] Pycharm Community installed version number is 2016.2.3" {
    assert "2016.2.3" bash -c "file $(which pycharm) | sed 's|\(.*/pycharm-community-\)\([^/]*\)\(/.*$\)|\2|'"
}
$ test.runner --level system --match pycharm
[+] Running test system/pycharm
 ✓ [S][EV] Pycharm is not an installed apt package.
 ✓ [S][EV] Pycharm Community edition is installed in /opt
 ✓ [S][EV] "pycharm" is /opt/dims/bin/pycharm
 ✓ [S][EV] /opt/dims/bin/pycharm is a symbolic link to installed pycharm
 ✓ [S][EV] Pycharm Community installed version number is 2016.2.3

5 tests, 0 failures
9.6.2. Organizing tests in DIMS Ansible Playbooks Roles
The DIMS project uses a more elaborate version of the above example, which
uses a drop-in model that allows any Ansible role to drop its own
tests into a structured hierarchy that supports fine-grained test
execution control. This drop-in model is implemented by the
tasks/bats-tests.yml task playbook.
To illustrate how this works, we start with an empty test directory:
$ tree /opt/dims/tests.d
/opt/dims/tests.d

0 directories, 0 files
The base role has the largest number of tests, since it does
the most complex foundational setup work for DIMS computer systems.
The template/tests directory is filled with Jinja template
Bash scripts and/or bats tests, in a hierarchy that includes
subdirectories for each of the defined test levels from Section
Test levels.
$ tree base/templates/tests
base/templates/tests
├── component
├── helpers.bash.j2
├── integration
├── README.txt
├── system
│   ├── deprecated.bats.j2
│   ├── dims-accounts.bats.j2
│   ├── dims-accounts-sudo.bats.j2
│   ├── dims-base.bats.j2
│   ├── dns.bats.j2
│   ├── proxy.bats.j2
│   ├── sudo
│   │   └── sudo-iptables.bats.j2
│   └── user
│       └── vpn.bats.j2
└── unit
    └── dims-filters.bats.j2

6 directories, 11 files
After running just the base role, the highlighted subdirectories that
correspond to each of the test levels are now present in the
/opt/dims/tests.d/ directory:
 $ tree /opt/dims/tests.d/
 /opt/dims/tests.d/
 ├── component
 │   └── helpers.bash -> /opt/dims/tests.d/helpers.bash
 ├── helpers.bash
 ├── integration
 │   └── helpers.bash -> /opt/dims/tests.d/helpers.bash
 ├── system
 │   ├── deprecated.bats
 │   ├── dims-accounts.bats
 │   ├── dims-accounts-sudo.bats
 │   ├── dims-base.bats
 │   ├── dims-ci-utils.bats
 │   ├── dns.bats
 │   ├── helpers.bash -> /opt/dims/tests.d/helpers.bash
 │   ├── iptables-sudo.bats
 │   ├── proxy.bats
 │   └── user
 │       ├── helpers.bash -> /opt/dims/tests.d/helpers.bash
 │       └── vpn.bats
 └── unit
     ├── bats-helpers.bats
     ├── dims-filters.bats
     ├── dims-functions.bats
     └── helpers.bash -> /opt/dims/tests.d/helpers.bash

 5 directories, 18 files
Here is the directory structure for tests in the docker role:
/docker/templates/tests
└── system
    ├── docker-consul.bats.j2
    ├── docker-core.bats.j2
    └── docker-network.bats.j2

1 directories, 3 files
If we now run the docker role, it will drop these files into
the system subdirectory:
$ dims.ansible-playbook --role docker

PLAY [Ansible (2.x / v2) Base Playbook] ****************************************

TASK [docker : include] ********************************************************
included: /home/dittrich/dims/git/ansible-playbooks/v2/tasks/pre_tasks.yml for dimsdemo1.devops.develop

 . . .

PLAY RECAP *********************************************************************
dimsdemo1.devops.develop   : ok=34   changed=20   unreachable=0    failed=0
There are now 3 additional files (see emphasized lines for the new additions):
 $ tree /opt/dims/tests.d
 /opt/dims/tests.d
 ├── component
 │   └── helpers.bash -> /opt/dims/tests.d/helpers.bash
 ├── helpers.bash
 ├── integration
 │   └── helpers.bash -> /opt/dims/tests.d/helpers.bash
 ├── system
 │   ├── deprecated.bats
 │   ├── dims-accounts.bats
 │   ├── dims-accounts-sudo.bats
 │   ├── dims-base.bats
 │   ├── dims-ci-utils.bats
 │   ├── dns.bats
 │   ├── docker-consul.bats
 │   ├── docker-core.bats
 │   ├── docker-network.bats
 │   ├── helpers.bash -> /opt/dims/tests.d/helpers.bash
 │   ├── iptables-sudo.bats
 │   ├── proxy.bats
 │   └── user
 │       ├── helpers.bash -> /opt/dims/tests.d/helpers.bash
 │       └── vpn.bats
 └── unit
     ├── bats-helpers.bats
     ├── dims-filters.bats
     ├── dims-functions.bats
     └── helpers.bash -> /opt/dims/tests.d/helpers.bash

 5 directories, 21 files
Tests can now be run by level, multiple levels at the same time,
or more fine-grained filtering can be performed using find
and grep filtering.
9.6.3. Running Bats Tests Using the DIMS test.runner
A test runner script (creatively named test.runner) is available to This
script builds on and extends the capabilities of scipts like test_runner.sh
from the GitHub docker/swarm/test/integration repository.
$ base/templates/tests/test.runner --help
usage: test.runner [options] args
flags:
  -d,--[no]debug:  enable debug mode (default: false)
  -E,--exclude:  tests to exclude (default: '')
  -L,--level:  test level (default: 'system')
  -M,--match:  regex to match tests (default: '.*')
  -l,--[no]list-tests:  list available tests (default: false)
  -t,--[no]tap:  output tap format (default: false)
  -S,--[no]sudo-tests:  perform sudo tests (default: false)
  -T,--[no]terse:  print only failed tests (default: false)
  -D,--testdir:  test directory (default: '/opt/dims/tests.d/')
  -u,--[no]usage:  print usage information (default: false)
  -v,--[no]verbose:  be verbose (default: false)
  -h,--help:  show this help (default: false)
To see a list of all tests under a given test level, specify the level using
the --level option. (The default is system). The following example
shows a list of all the available system level tests:
$ test.runner --list-tests
system/dims-base.bats
system/pycharm.bats
system/dns.bats
system/docker.bats
system/dims-accounts.bats
system/dims-ci-utils.bats
system/deprecated.bats
system/coreos-prereqs.bats
system/user/vpn.bats
system/proxy.bats
To see all tests under any level, use * or a space-separated list
of levels:
$ test.runner --level "*" --list-tests
system/dims-base.bats
system/pycharm.bats
system/dns.bats
system/docker.bats
system/dims-accounts.bats
system/dims-ci-utils.bats
system/deprecated.bats
system/coreos-prereqs.bats
system/user/vpn.bats
system/proxy.bats
unit/dims-filters.bats
unit/bats-helpers.bats
Certain tests that require elevated privileges (i.e., use of sudo)
are handled separately. To list or run these tests, use the --sudo-tests
option:
$ test.runner --list-tests --sudo-tests
system/dims-accounts-sudo.bats
system/iptables-sudo.bats
A subset of the tests can be selected using the --match option.
To see all tests that include the word dims, do:
$ test.runner --level system --match dims --list-tests
system/dims-base.bats
system/dims-accounts.bats
system/dims-ci-utils.bats
The --match option takes a an egrep expression to filter
the selected tests, so multiple substrings (or regular expressions)
can be passed with pipe separation:
$ test.runner --level system --match "dims|coreos" --list-tests
system/dims-base.bats
system/dims-accounts.bats
system/dims-ci-utils.bats
system/coreos-prereqs.bats
There is a similar option --exclude that filters out tests by
egrep regular expression. Two of the four selected tests are
then excluded like this:
$ test.runner --level system --match "dims|coreos" --exclude "base|utils" --list-tests
system/dims-accounts.bats
system/coreos-prereqs.bats
9.6.4. Controlling the Amount and Type of Output
The default for the bats program is to use --pretty formatting when
standard output is being sent to a terminal. This allows the use of colors and
characters like ✓ and ✗ to be used for passed and failed tests (respectively).
$ bats --help

[No write since last change]
Bats 0.4.0
Usage: bats [-c] [-p | -t] <test> [<test> ...]

  <test> is the path to a Bats test file, or the path to a directory
  containing Bats test files.

  -c, --count    Count the number of test cases without running any tests
  -h, --help     Display this help message
  -p, --pretty   Show results in pretty format (default for terminals)
  -t, --tap      Show results in TAP format
  -v, --version  Display the version number

  For more information, see https://github.com/sstephenson/bats


Press ENTER or type command to continue
We will limit the tests in this example to just those for pycharm
and coreos in their names. These are relatively small tests, so it is
easier to see the effects of the options we will be examining.
$ test.runner --match "pycharm|coreos" --list-tests
system/pycharm.bats
system/coreos-prereqs.bats
The DIMS test.runner script follows this same default output
style of bats, so just running the two tests above gives
the following output:
$ test.runner --match "pycharm|coreos"
[+] Running test system/pycharm.bats
 ✓ [S][EV] Pycharm is not an installed apt package.
 ✓ [S][EV] Pycharm Community edition is installed in /opt
 ✓ [S][EV] "pycharm" is /opt/dims/bin/pycharm
 ✓ [S][EV] /opt/dims/bin/pycharm is a symbolic link to installed pycharm
 ✓ [S][EV] Pycharm Community installed version number is 2016.2.2

5 tests, 0 failures
[+] Running test system/coreos-prereqs.bats
 ✓ [S][EV] consul service is running
 ✓ [S][EV] consul is /opt/dims/bin/consul
 ✓ [S][EV] 10.142.29.116 is member of consul cluster
 ✓ [S][EV] 10.142.29.117 is member of consul cluster
 ✓ [S][EV] 10.142.29.120 is member of consul cluster
 ✓ [S][EV] docker overlay network "ingress" exists
 ✗ [S][EV] docker overlay network "app.develop" exists
   (from function `assert' in file system/helpers.bash, line 18,
    in test file system/coreos-prereqs.bats, line 41)
     `assert 'app.develop' bash -c "docker network ls --filter driver=overlay | awk '/app.develop/ { print \$2; }'"' failed
   expected: "app.develop"
   actual:   ""
 ✗ [S][EV] docker overlay network "data.develop" exists
   (from function `assert' in file system/helpers.bash, line 18,
    in test file system/coreos-prereqs.bats, line 45)
     `assert 'data.develop' bash -c "docker network ls --filter driver=overlay | awk '/data.develop/ { print \$2; }'"' failed
   expected: "data.develop"
   actual:   ""

8 tests, 2 failures
To get TAP compliant output, add the --tap (or
-t) option:
$ test.runner --match "pycharm|coreos" --tap
[+] Running test system/pycharm.bats
1..5
ok 1 [S][EV] Pycharm is not an installed apt package.
ok 2 [S][EV] Pycharm Community edition is installed in /opt
ok 3 [S][EV] "pycharm" is /opt/dims/bin/pycharm
ok 4 [S][EV] /opt/dims/bin/pycharm is a symbolic link to installed pycharm
ok 5 [S][EV] Pycharm Community installed version number is 2016.2.2
[+] Running test system/coreos-prereqs.bats
1..8
ok 1 [S][EV] consul service is running
ok 2 [S][EV] consul is /opt/dims/bin/consul
ok 3 [S][EV] 10.142.29.116 is member of consul cluster
ok 4 [S][EV] 10.142.29.117 is member of consul cluster
ok 5 [S][EV] 10.142.29.120 is member of consul cluster
ok 6 [S][EV] docker overlay network "ingress" exists
not ok 7 [S][EV] docker overlay network "app.develop" exists
# (from function `assert' in file system/helpers.bash, line 18,
#  in test file system/coreos-prereqs.bats, line 41)
#   `assert 'app.develop' bash -c "docker network ls --filter driver=overlay | awk '/app.develop/ { print \$2; }'"' failed
# expected: "app.develop"
# actual:   ""
not ok 8 [S][EV] docker overlay network "data.develop" exists
# (from function `assert' in file system/helpers.bash, line 18,
#  in test file system/coreos-prereqs.bats, line 45)
#   `assert 'data.develop' bash -c "docker network ls --filter driver=overlay | awk '/data.develop/ { print \$2; }'"' failed
# expected: "data.develop"
# actual:   ""
When running a large suite of tests, the total number of individual tests
can get very large (along with the resulting output). To increase the signal
to noise ratio, you can use the --terse option to filter out all of
the successful tests, just focusing on the remaining failed tests. This is
handy for things like validation of code changes and regression testing
of newly provisioned Vagrant virtual machines.
$ test.runner --match "pycharm|coreos" --terse
[+] Running test system/pycharm.bats

5 tests, 0 failures
[+] Running test system/coreos-prereqs.bats
 ✗ [S][EV] docker overlay network "app.develop" exists
   (from function `assert' in file system/helpers.bash, line 18,
    in test file system/coreos-prereqs.bats, line 41)
     `assert 'app.develop' bash -c "docker network ls --filter driver=overlay | awk '/app.develop/ { print \$2; }'"' failed
   expected: "app.develop"
   actual:   ""
 ✗ [S][EV] docker overlay network "data.develop" exists
   (from function `assert' in file system/helpers.bash, line 18,
    in test file system/coreos-prereqs.bats, line 45)
     `assert 'data.develop' bash -c "docker network ls --filter driver=overlay | awk '/data.develop/ { print \$2; }'"' failed
   expected: "data.develop"
   actual:   ""

8 tests, 2 failures
Here is the same examples as above, but this time using the TAP compliant output:
$ test.runner --match "pycharm|coreos" --tap
[+] Running test system/pycharm.bats
1..5
ok 1 [S][EV] Pycharm is not an installed apt package.
ok 2 [S][EV] Pycharm Community edition is installed in /opt
ok 3 [S][EV] "pycharm" is /opt/dims/bin/pycharm
ok 4 [S][EV] /opt/dims/bin/pycharm is a symbolic link to installed pycharm
ok 5 [S][EV] Pycharm Community installed version number is 2016.2.2
[+] Running test system/coreos-prereqs.bats
1..8
ok 1 [S][EV] consul service is running
ok 2 [S][EV] consul is /opt/dims/bin/consul
ok 3 [S][EV] 10.142.29.116 is member of consul cluster
ok 4 [S][EV] 10.142.29.117 is member of consul cluster
ok 5 [S][EV] 10.142.29.120 is member of consul cluster
ok 6 [S][EV] docker overlay network "ingress" exists
not ok 7 [S][EV] docker overlay network "app.develop" exists
# (from function `assert' in file system/helpers.bash, line 18,
#  in test file system/coreos-prereqs.bats, line 41)
#   `assert 'app.develop' bash -c "docker network ls --filter driver=overlay | awk '/app.develop/ { print \$2; }'"' failed
# expected: "app.develop"
# actual:   ""
not ok 8 [S][EV] docker overlay network "data.develop" exists
# (from function `assert' in file system/helpers.bash, line 18,
#  in test file system/coreos-prereqs.bats, line 45)
#   `assert 'data.develop' bash -c "docker network ls --filter driver=overlay | awk '/data.develop/ { print \$2; }'"' failed
# expected: "data.develop"
# actual:   ""
$ test.runner --match "pycharm|coreos" --tap --terse
[+] Running test system/pycharm.bats
1..5
[+] Running test system/coreos-prereqs.bats
1..8
not ok 7 [S][EV] docker overlay network "app.develop" exists
# (from function `assert' in file system/helpers.bash, line 18,
#  in test file system/coreos-prereqs.bats, line 41)
#   `assert 'app.develop' bash -c "docker network ls --filter driver=overlay | awk '/app.develop/ { print \$2; }'"' failed
# expected: "app.develop"
# actual:   ""
not ok 8 [S][EV] docker overlay network "data.develop" exists
# (from function `assert' in file system/helpers.bash, line 18,
#  in test file system/coreos-prereqs.bats, line 45)
#   `assert 'data.develop' bash -c "docker network ls --filter driver=overlay | awk '/data.develop/ { print \$2; }'"' failed
# expected: "data.develop"
# actual:   ""
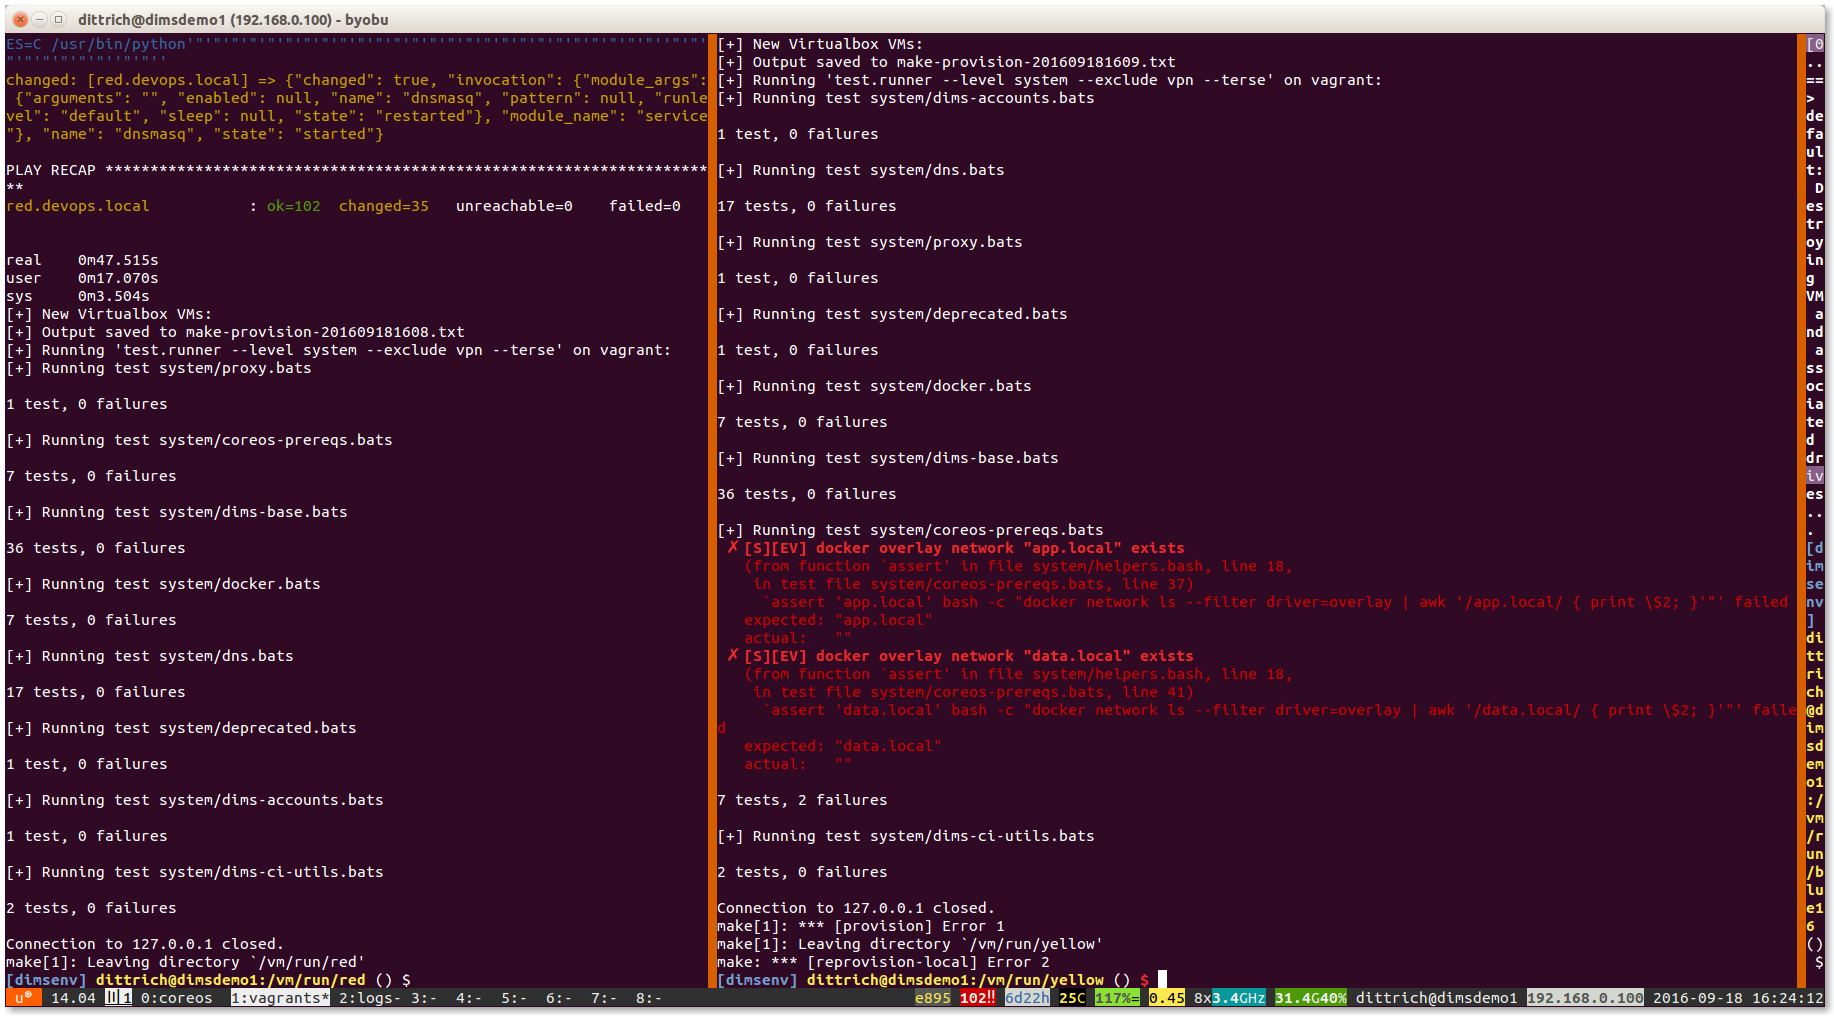
Figure vagrantTestRunner shows the output of
test.runner --level system --terse at the completion of provisioning
of two Vagrants. The one on the left has passed all tests, while the Vagrant
on the right has failed two tests. Note that the error result has been
passed on to make, which reports the failure and passes it along
to the shell (as seen by the red $ prompt on the right, indicating
a non-zero return value).
9.7. Using DIMS Bash functions in Bats tests
The DIMS project Bash shells take advantage of a library of functions
that are installed by the base role into $DIMS/bin/dims_functions.sh.
Bats has a pre- and post-test hooking feature that is very tersely documented (see setup and teardown: Pre- and post-test hooks):
You can define special setup and teardown functions, which run before and after each test case, respectively. Use these to load fixtures, set up your environment, and clean up when you’re done.
What this means is that if you define a setup() function, it will be run
before every @test, and if you define a teardown() function, it will
be run after every @test.
We can take advantage of this to source the common DIMS dims_functions.sh
library, making any defined functions in that file available to be called
directly in a @TEST the same way it would be called in a Bash script.
An example of how this works can be seen in the
unit tests for the dims_functions.sh library itself.
1 2 3 4 5 6 7 8 9 10 11 12 13 14 15 16 17 18 19 20 21 22 23 24 25 26 27 28 29 30 31 32 33 34 35 36 37 38 39 40 41 42 43 44 45 46 47 48 49 50 51 52 53 54 55 56 57 58 59 60 61 62 63 64 | #!/usr/bin/env bats
#
# Ansible managed: /home/dittrich/dims/git/ansible-playbooks/v2/roles/base/templates/../templates/tests/./unit/dims-functions.bats.j2 modified on 2016-10-01 13:50:49 by dittrich on dimsdemo1 [ansible-playbooks v1.3.33]
#
# vim: set ts=4 sw=4 tw=0 et :
load helpers
function setup() {
source $DIMS/bin/dims_functions.sh
}
@test "[U][EV] say() strips whitespace properly" {
assert '[+] unce, tice, fee times a madie...' say ' unce, tice, fee times a madie... '
}
# This test needs to directly source dims_functions in bash command string because of multi-command structure.
@test "[U][EV] add_on_exit() saves and get_on_exit() returns content properly" {
assert "'([0]=\"cat /dev/null\")'" bash -c ". $DIMS/bin/dims_functions.sh; touch /tmp/foo; add_on_exit cat /dev/null; get_on_exit"
}
@test "[U][EV] get_hostname() returns hostname" {
assert "$(hostname)" get_hostname
}
@test "[U][EV] is_fqdn host.category.deployment returns success" {
is_fqdn host.category.deployment
}
@test "[U][EV] is_fqdn host.subdomain.category.deployment returns success" {
is_fqdn host.subdomain.category.deployment
}
@test "[U][EV] is_fqdn 12345 returns failure" {
! is_fqdn 12345
}
@test "[U][EV] parse_fqdn host.category.deployment returns 'host category deployment'" {
assert "host category deployment" parse_fqdn host.category.deployment
}
@test "[U][EV] get_deployment_from_fqdn host.category.deployment returns 'deployment'" {
assert "deployment" get_deployment_from_fqdn host.category.deployment
}
@test "[U][EV] get_category_from_fqdn host.category.deployment returns 'category'" {
assert "category" get_category_from_fqdn host.category.deployment
}
@test "[U][EV] get_hostname_from_fqdn host.category.deployment returns 'host'" {
assert "host" get_hostname_from_fqdn host.category.deployment
}
@test "[U][EV] plural_s returns 's' for 0" {
assert "s" plural_s 0
}
@test "[U][EV] plural_s returns '' for 1" {
assert "" plural_s 1
}
@test "[U][EV] plural_s returns 's' for 2" {
assert "s" plural_s 2
}
|
Attention
Note that there is one test, shown on lines 17 through 20, that has multiple
commands separated by semicolons. That compound command sequence needs to be
run as a single command string using bash -c, which means it is going
to be run as a new sub-process to the assert command line. Sourcing
the functions in the outer shell does not make them available in the sub-process,
so that command string must itself also source the dims_functions.sh library
in order to have the functions defined at that level.